How To Create Forms In Outlook 2016
Note: This post content is applicable to Office 2019,2016, 2013, 2010; desktop and Office 365 versions; Windows 10, 8 and 7;
Post updated on: May 2020
Here's a question from Deanne:
I work in the Retail industry. I use Outlook in order to manage my contact information. I am quite fond of Outlook as my contact manager, but clearly i need to be able to enhance the basic contact form capabilities. My requirement is to be able to add several fields that will allow me to store links to the the social media profiles of each of my contacts. Long story short, I guess i have a couple questions here: First, how to make the menu item buttons that will allow me to interact with Outlook forms and second: how to actually go ahead and create or modify my Contact form. Any hints are super appreciated. Thanks!
In this post, we'll teach you how you can easily create custom fillable user forms in Microsoft Outlook. We'll customize the Contact form as an example, however the process is fully applicable for emails, tasks, task requests, appointment invitations, journal entries and so forth.
OK.. let's get started.
Working with forms in Outlook is not particularly difficult. Outlook ships several predefined templates, and the basic idea is to customize those templates according to your needs.
Create custom Outlook Forms
Here's the process for inserting and editing Outlook user forms:
- Setup your Outlook Developer tab.
- Open an existing Outlook form.
- Modify the form to include your custom fields as needed.
- Save your custom user form.
- Thoroughly test your work.
- Share with other Outlook users in your workplace or group so they can use the useful form you just created :-).
Outlook Forms: A detailed example
Microsoft Outlook ships a nice collection of forms related to the main Outlook objects that you can select and jump-start your form development process. That's very useful because we don't want to re-invent the wheel. In this tutorial, we'll just go ahead and extend the already existing Contacts form stored in your standard forms library.
Specifically, we'll focus specifically you how to customize the Contacts form. For convenience, we'll assume that you'll want to manage the following social media information for your contact people:
- LinkedIn profile
- Twitter profile
- Facebook profile
- Facebook Group
Here's how our custom Outlook userform will look like:
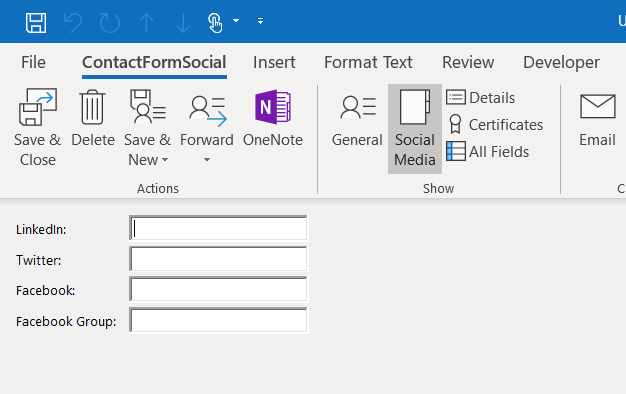
Step 0: Setting up the Developer tab
As noted by the reader above, before we get started with our custom Outlook forms, we need to enable the so-called Developer tab. This will allow us to access the Outlook capabilities we need in order to develop our own forms.
Here's how to do it:
- First off, go ahead and open Microsoft Outlook.
- Now right click the Ribbon and select Customize Ribbon.

- Click on the Developer Check box and select OK.

- You'll now notice the newly added Developer tab in your Ribbon.
Step 1: Open your existing form
- On your Outlook Ribbon, go ahead and hit the Developer menu.
- Now go ahead and hit Design a form.
- In the Look In box field ensure that Standard Forms library is selected.
- Select the Contact form.
- Hit Open.
- Now we'll go ahead and modify the existing Contact form.
- You"ll notice that our form was opened in Design View.
- In the next step, we are going to add several new custom fields to hold our Contact Social Media information.
Step 2: Add custom Form fields
In this step, we'll go ahead and create custom form fields (columns0 for the Social Media information.
- In your Ribbon Tools group, hit the Field Chooser button.
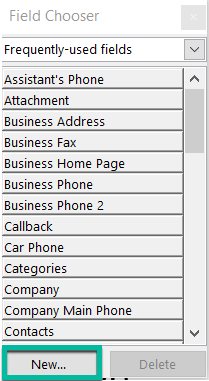
- This dialog will open up.At the bottom of the Field Chooser dialog, hit New.
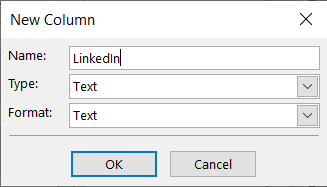
- Create your first new Column, call it LinkedIn, choose Type = Text and Format = Text, as shown below.
- Now repeat the process above for the next 3 fields: Twitter, Facebook, Facebook Group.
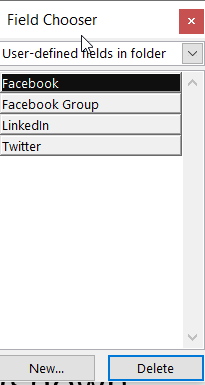
- You'll notice your new fields in the User defined fields in folder section as shown below:
Step 3: Add a custom Form page
In this step we'll add a custom page to the Contact Form. In that page we'll store the Social Media profile fields.
- Now go ahead and hit the (P.2) tab next to the General as shown below.

- Now from the Ribbon, hit the Page button and select Rename Page.
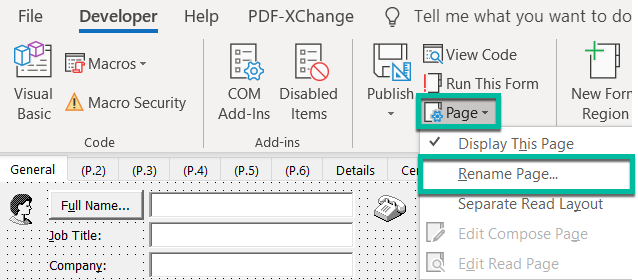
- Enter Social Media in the Page Name field and hit OK.
- Now drag the four fields from the Field Choose to your Social Media Page and position them as shown below:
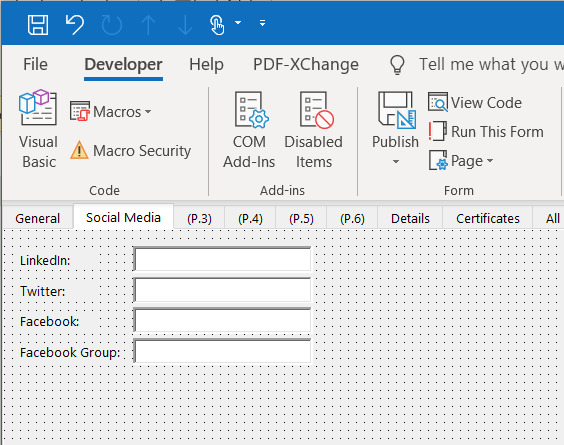
- Note: In order to align your custom fields, just select them (ensure you hit the CTRL button as you select them all), then make a right click and hit Align, then select the alignment direction.
- As part of your form development you should check your work periodically. The best way to do that is by hitting the Run this Form button. This will show you how your work will look to the user.
Step 4: Save your Outlook form
As you have seen before, your modified Contact form is still in Design Mode. If you want to start using it you should publish it to your Form library. According to your permissions, you might be able to make it available for your own usage or allow other colleague in your organization to use it as well.
- From your Ribbon, hit the Publish button.
- Select Publish Form As..
- Under Display Name type ContactFormSocial
- Hit Publish.
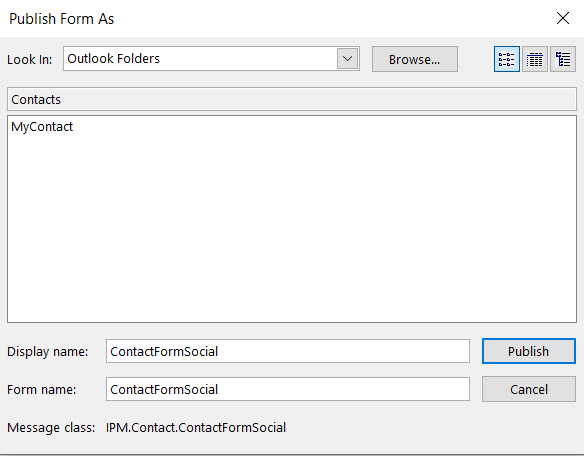
Advanced User Note: Your form will be saved as an .oft file in the AppData directory of your home directory:: \AppData\Roaming\Microsoft\Templates.
Step 5: Try out your new form
We are almost there. Now it is time to go ahead and give our work a try.
- Open your Contacts tab in Outlook.
- Hit New Items.
- Hit Custom Forms.
- Select your ContactFormSocial entry.
- Hit the Social Media button in the Ribbon (you just added it in the previous step ;-))
- Voila' – done!

Step 6: Use your new contact form by default
If you are satisfied with the result of your work, you can set your new form as the default Contact form in Microsoft Outlook. Do this only after you have followed the entire tutorial, as this step is irrelevant otherwise.
Proceed as following:
- Navigate to the Contact tab.
- Highlight your Contacts library folder (by default it is named Contacts).
- Right Click and select Properties.
- In the General tab, select your form name (in our case ContactFormSocial) in the When posting to the folder field.
- Hit OK.
Outlook meeting form templates
If you are looking for a more in-depth tutorial, make sure you visit this detailed example of an email and appointment template design for Outlook (applicable to both Windows and macOSX)
Where to find my Outlook templates?
A couple of readers had some trouble finding the storage location of their custom user forms for Outlook.
By default, the location is under your user account. In Windows 10 /8 or 7, it's therefore going to probably be: C\:users\<your_user_name>\AppData\Roaming\Microsoft\Templates.
How To Create Forms In Outlook 2016
Source: https://www.easytweaks.com/add-custom-form-excel-word-outlook-2016/
Posted by: foltzchai1944.blogspot.com

0 Response to "How To Create Forms In Outlook 2016"
Post a Comment